Hannes Heikinheimo
Sep 19, 2023
1 min read
Online video chat applications are used by millions of people every day. Many times it would be handy to go back to what somebody might have said earlier, yet quite few video chat applications offer real-time transcription.
In this tutorial we'll learn how to create a WebRTC video chat application that transcribes the users’ speech in real-time using the Speechly Browser Client. We'll also cover how to use a MediaStream instead of the users’ microphone as well as how to use our new VAD (Voice Activity Detector) feature for a completely hands-free experience.
This guide uses vanilla JavaScript, HTML and CSS. The same core concepts apply whether you choose to use React, Vue or any other framework.
This guide uses Muaz Khan’s WebRTC Meeting example as a starting point. Kudos to him for making this available!
speechly-webrtc/
├── index.html
├── style.css
└── main.js
In index.html create a basic HTML document and add the following content. It's very basic for now, we'll expand this later when adding more features.
<div class="app">
  <div id="lobby" class="lobby">
    <h2>Start a meeting</h2>
    <button id="new-room">New meeting</button>
  </div>
  <div id="room" class="room">
    <div class="room-container">
      <div class="room-header">
        <h2 id="room-name"></h2>
        <button id="leave-room">Leave</button>
      </div>
      <div id="streams" class="room-streams"></div>
    </div>
  </div>
</div>
In index.html add the following script tags before the closing </body> tag.
<script src="https://webrtc.github.io/adapter/adapter-latest.js"></script>
<script src="https://cdn.webrtc-experiment.com/CodecsHandler.js"></script>
<script src="https://cdn.webrtc-experiment.com/IceServersHandler.js"></script>
<script src="https://cdn.webrtc-experiment.com/meeting.js"></script>
<script type="module" src="main.js"></script>
In main.js start by setting up the meeting object and a few HTML elements
const meeting = new Meeting();

const roomName = document.getElementById("room-name");
const streamsContainer = document.getElementById("streams");
const newRoomBtn = document.getElementById("new-room");
const leaveRoomBtn = document.getElementById("leave-room");
Handle adding of a new stream, placing yourself first
meeting.onaddstream = function(e) {
  if (e.type == "local") streamsContainer.insertBefore(e.video, streamsContainer.firstChild);
  if (e.type == "remote") streamsContainer.appendChild(e.video);
};
Handle signaling using websocket
meeting.openSignalingChannel = function(onmessage) {
  let channel = location.href.replace(/\/|:|#|%|\.|\[|\]/g, "");
  let websocket = new WebSocket("wss://muazkhan.com:9449/");
  websocket.onopen = function() {
    websocket.push(JSON.stringify({
      open: true,
      channel: channel
    }));
  };
  websocket.push = websocket.send;
  websocket.send = function(data) {
    if (websocket.readyState != 1) {
      return setTimeout(function() {
        websocket.send(data);
      }, 300);
    }
    websocket.push(JSON.stringify({
      data: data,
      channel: channel
    }));
  };
  websocket.onmessage = function(e) {
    onmessage(JSON.parse(e.data));
  };
  return websocket;
};
Handle users leaving the room
meeting.onuserleft = function(userid) {
  let video = document.getElementById(userid);
  if (video) video.parentNode.removeChild(video);
};
Bind buttons for creating a new meeting and leaving the meeting
newRoomBtn.onclick = function() {
  let name = Math.random().toString(36).slice(2, 10)
  meeting.setup(name);
  roomName.textContent = name
};

leaveRoomBtn.onclick = function() {
  meeting.leave();
  location.reload();
};
Start a local development server of your choice (i'm using the Live Server extension for Visual Studio Code) and view it in your browser.
On the newly created page go ahead start a new meeting. The browser will ask for permission to use your microphone and camera. Press Allow and you should have something like this running.

Now that the basic meeting is working, let's show/hide the lobby and meeting room as needed. Start by defining a few HTML elements along with a helper function.
const meetingLobby = document.getElementById("lobby");
const meetingRoom = document.getElementById("room");

function setupMeetingRoom(roomid) {
  meetingLobby.style.display = "none";
  meetingRoom.style.display = "grid";
  roomName.textContent = roomid;
}
Then update the newRoomBtn.onclick event to use the new helper function.
newRoomBtn.onclick = function() {
  let name = Math.random().toString(36).slice(2, 10)
  meeting.setup(name);
  setupMeetingRoom(name);
};
Then add some basic styles. Remember to import the style sheet by using <link href="style.css" rel="stylesheet" />.
.app {
  font-family: sans-serif;
  position: absolute;
  top: 0;
  right: 0;
  bottom: 0;
  left: 0;
}

.lobby {
  display: flex;
  flex-direction: column;
  justify-content: center;
  max-width: 300px;
  height: 100%;
  margin: auto;
}

.room {
  display: none;
  grid-template-columns: 2fr 1fr;
  height: 100%
}
Now the meeting room should be hidden by default and only the lobby should be visible. Once you join a meeting the lobby is hidden and the meeting room is shown.
Now that the basic video chat app is working, let's add the Speechly Browser Client and start transcribing speech.
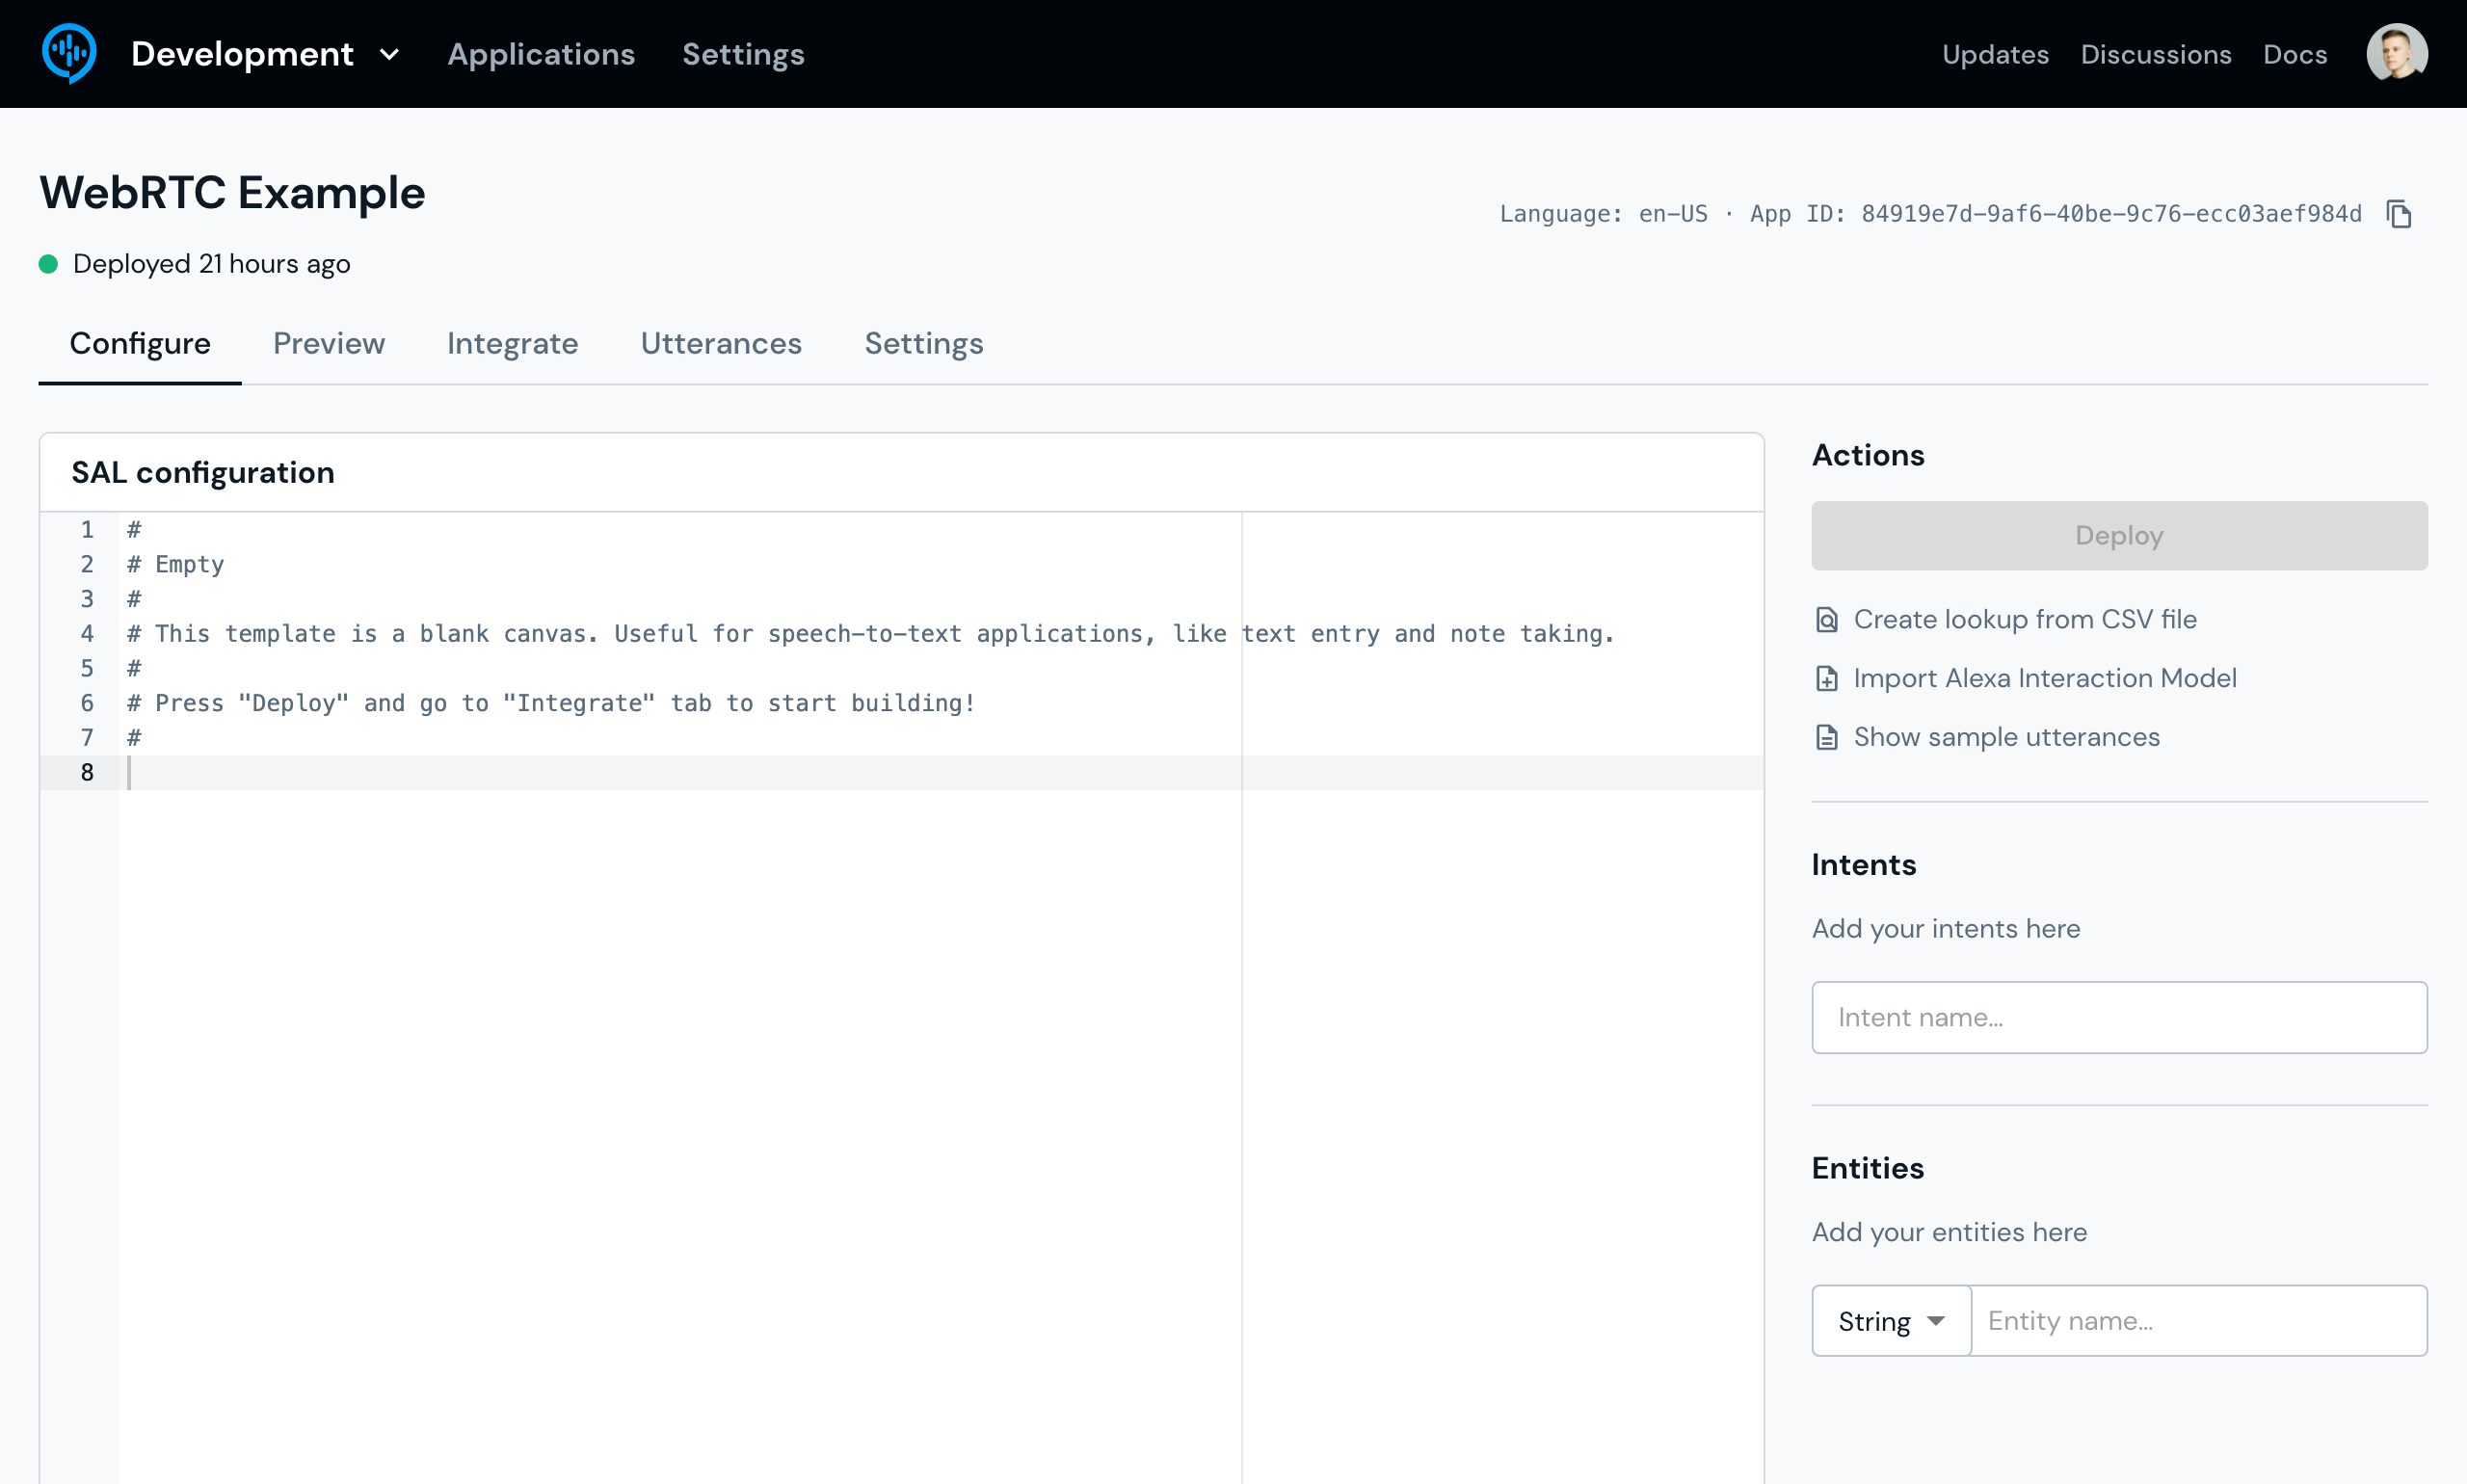
Head over to the Speechly Dashboard, log in or create an account, and create a new application using the Empty template.
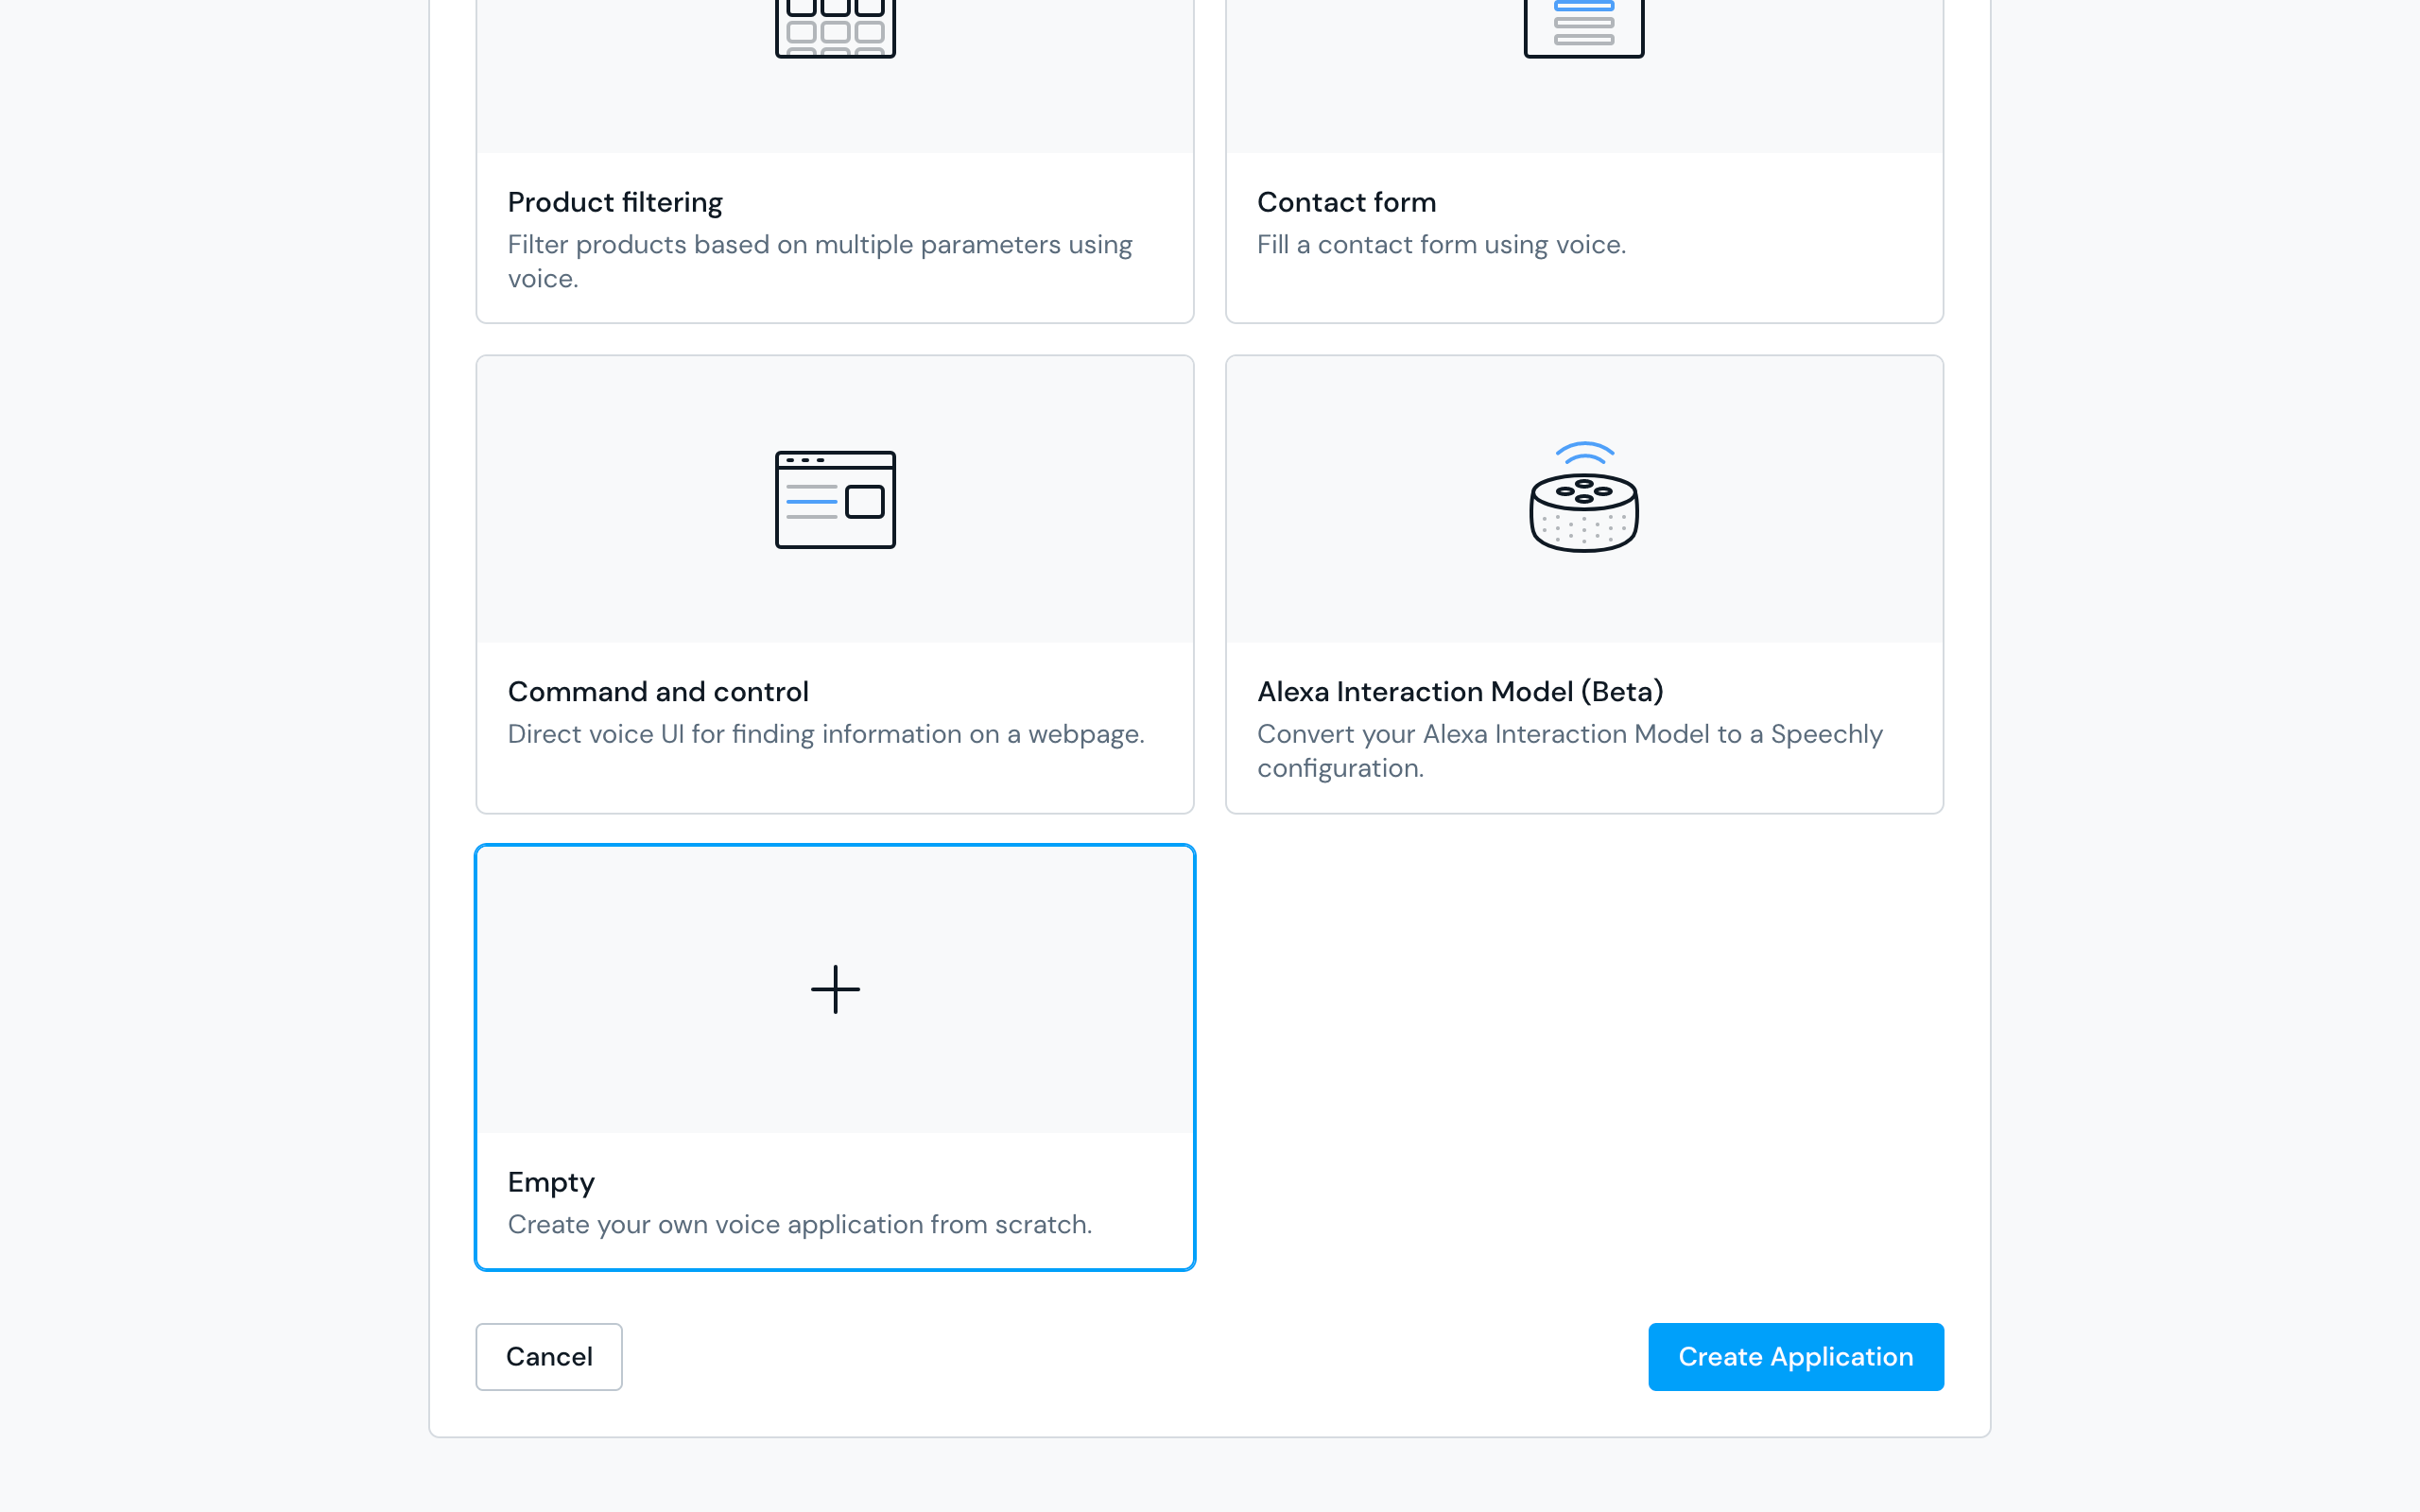
Since we're interested in transcribing speech, there's no need for us to write any SAL configuration. Just hit Deploy and copy the App ID, you'll need it shortly.
In main.js import the Speechly Browser Client and create an instance of it.
import { BrowserClient } from "//unpkg.com/@speechly/browser-client?module=true"

const speechly = new BrowserClient({
  appId: "YOUR-APPID-FROM-DASHBOARD",
  debug: true,
  logSegments: true,
  vad: {
    enabled: true,
    noiseGateDb: -24.0
  }
});
The VAD is one of our latest features and it's perfect for this case. It takes care of connecting/disconnecting to Speechly backend based on input levels to your microphone. It has a lot more options than shown here, but for now you just need to enable it and set a sensible threshold to get started.
Then in the meeting.onaddstream method, change the function to async and attach the MediaStream to the Speechly Browser Client. At the same go, hide the video controls since they aren't really that useful here.
meeting.onaddstream = async function(e) {
  await speechly.attach(e.stream);
  e.video.controls = false;
  if (e.type == "local") streamsContainer.insertBefore(e.video, streamsContainer.firstChild);
  if (e.type == "remote") streamsContainer.appendChild(e.video);
};
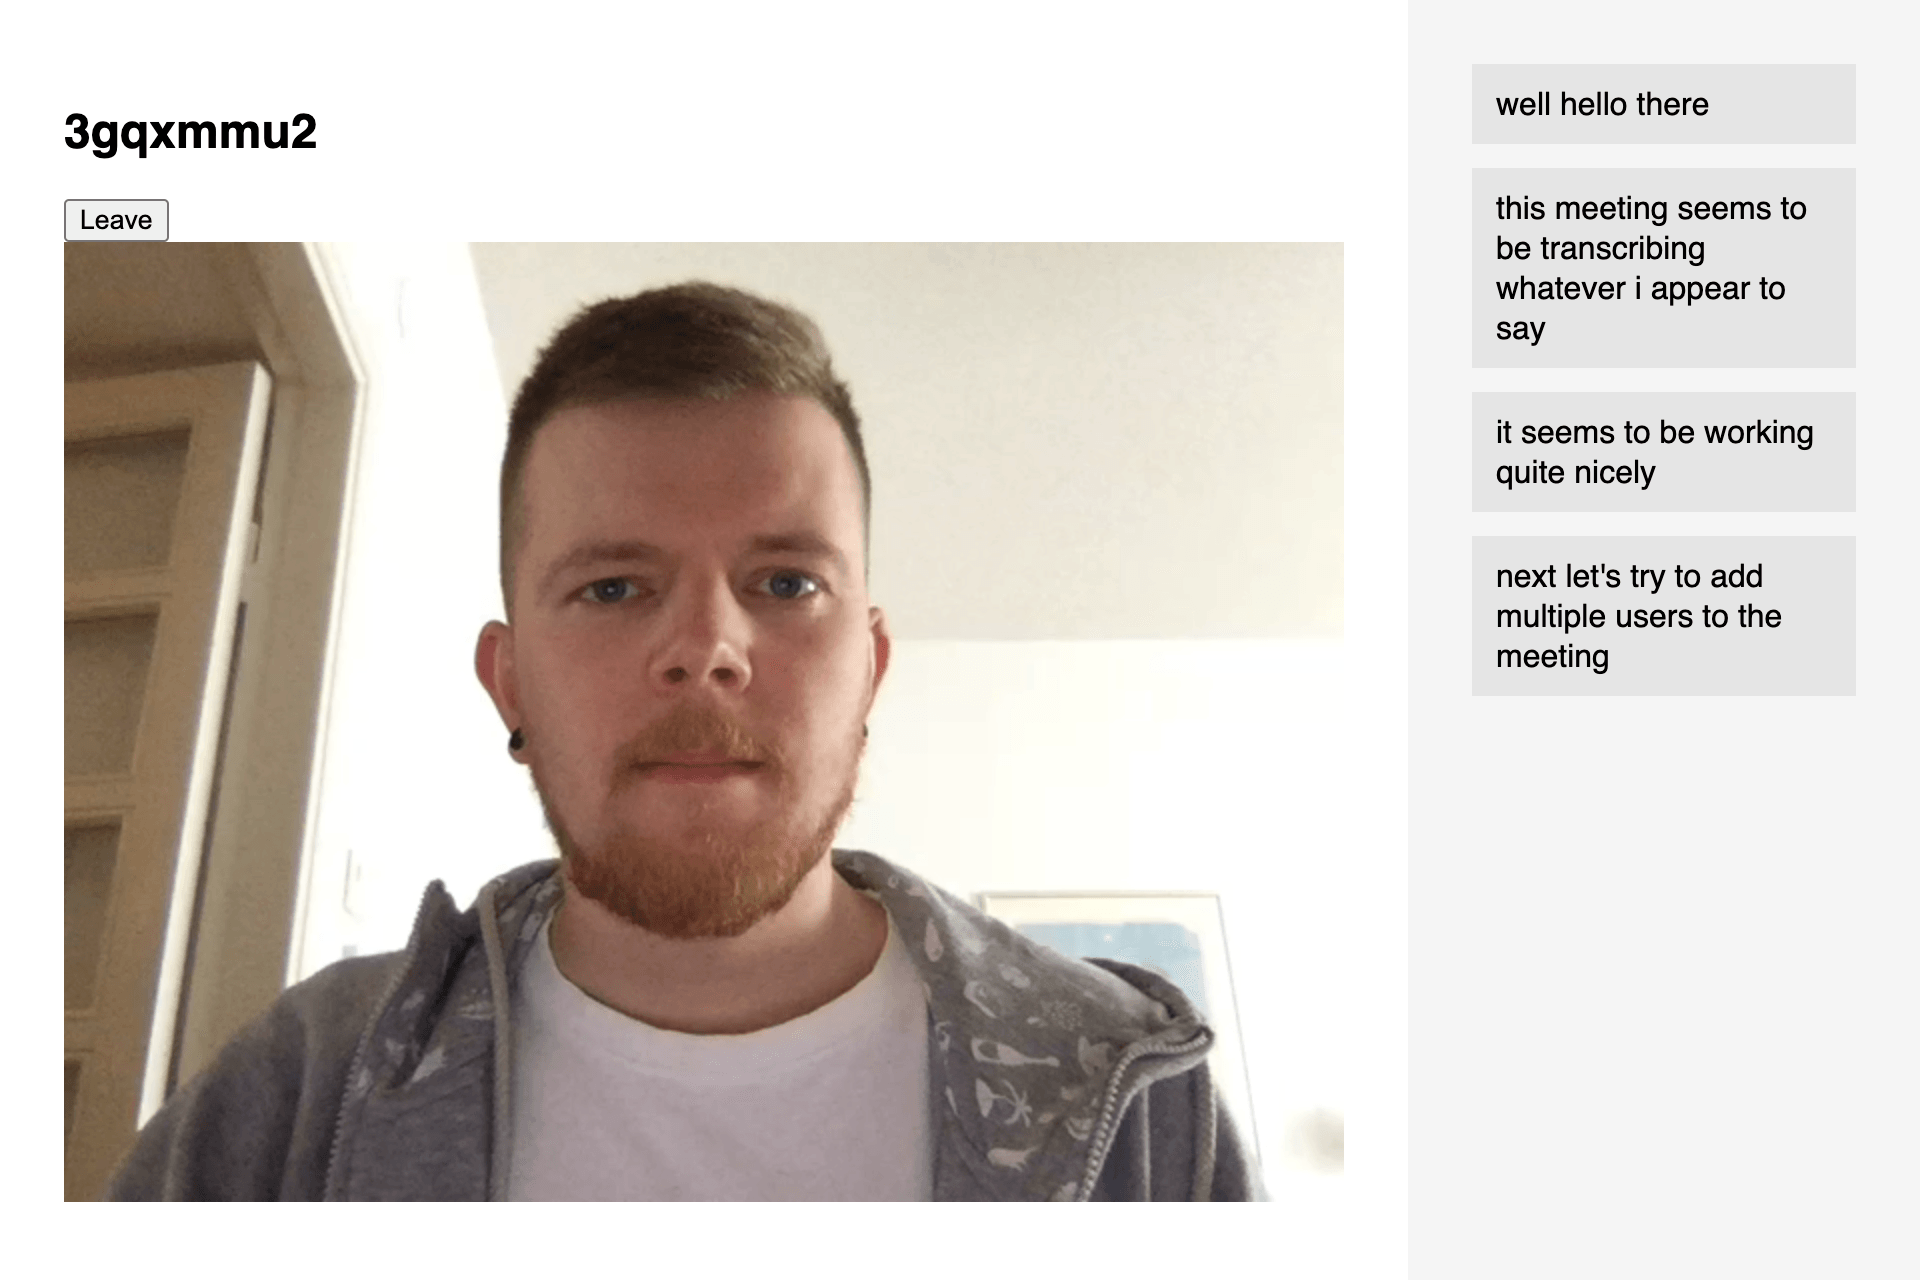
Now when you start a meeting and open your console, you should see speech segments being logged!
First create an element that will display the transcript, place it next to the room-container div.
<div id="room" class="room">
  <div class="room-container">
    <div class="room-header">
      <h2 id="room-name"></h2>
      <button id="leave-room">Leave</button>
    </div>
    <div id="streams" class="room-streams"></div>
  </div>
  <div id="transcript" class="room-transcript"></div>
</div>
Then use the onSegmentChange method to listen to speech segments and show them in the newly created container once the segment is marked as isFinal. As the segment contains an array of uppercase words, they first need to be lower cased and then joined into a string.
const transcriptContainer = document.getElementById("transcript");

speechly.onSegmentChange(segment => {
  if (segment && segment.isFinal) {
    let text = segment.words.map(w => w.value.toLowerCase()).join(" ");
    let div = document.createElement("div");
    div.textContent = text;
    transcriptContainer.appendChild(div);
  }
});
Then add a bit of styles to separate the segments from each other and make the transcript div scrollable.
.room-container {
  padding: 32px;
}

.room-transcript {
  overflow-y: auto;
  display: flex;
  flex-direction: column;
  gap: 12px;
  background-color: #f5f5f5;
  padding: 32px;
}

.room-transcript div {
  background-color: #e5e5e5;
  padding: 10px 12px;
  line-height: 1.25;
}
The above solution adds a segment to the transcript when the segment is marked as isFinal. If you wish to make the transcript even more real-time, you can show the tentative segment and keep on updating that until the segment is marked as isFinal.
speechly.onSegmentChange(segment => {
  if (segment) {
    let text = segment.words.map(w => w.value.toLowerCase()).join(" ");

    let div = document.createElement("div");
    let id = segment.contextId + "-" + segment.id;
    div.id = id;

    let segmentDiv = document.getElementById(id);
    if (segmentDiv) segmentDiv.textContent = text;
    if (!segmentDiv) transcriptContainer.appendChild(div);

    if (segment.isFinal) {
      segmentDiv.textContent = text;
    }
  }
});
By now, you should have an video chat application that transcribes speech in real-time!
First add a button for copying the current meeting id as well as a place for the joining user to input it.
<div class="app">
  <div id="lobby" class="lobby">
    <h2>Start a meeting</h2>
    <button id="new-room">New meeting</button>
    <br/>
    <h2>Join a meeting</h2>
    <div class="lobby-join">
      <input type="text" id="meeting-room-id" placeholder="Meeting ID">
      <button id="join-room">Join</button>
    </div>
  </div>
  <div id="room" class="room">
    <div class="room-container">
      <div class="room-header">
        <h2 id="room-name"></h2>
        <button id="copy-room">Copy</button>
        <button id="leave-room">Leave</button>
      </div>
      <div id="streams" class="room-streams"></div>
    </div>
    <div id="transcript" class="room-transcript"></div>
  </div>
</div>
Then add two new methods, one for checking for created meeting rooms and for alerting for each new meeting. You'll also need to bind the two new buttons click events.
const copyRoomBtn = document.getElementById("copy-room");
const joinRoomBtn = document.getElementById("join-room");

meeting.onmeeting = function(room) {
  if (!room) return

  joinRoomBtn.onclick = function() {
    let id = document.getElementById("meeting-room-id").value;
    if (id !== room.roomid) return
    meeting.meet(room)
    setupMeetingRoom(room.roomid)
  }
};

meeting.check();

copyRoomBtn.onclick = function() {
  navigator.clipboard.writeText(roomName.textContent)
}
In the meeting.onmeeting method we check if the inputted id matches any of the received meeting rooms. If it does, the user will join that meeting.
Now that multiple video streams appear in the room, they layout looks a bit off. Let's fix that by adjusting the header and displaying videos in a grid.
.room-header {
  display: flex;
  align-items: center;
  gap: 8px;
  margin-bottom: 32px;
}

.room-header h2 {
  margin: 0;
}

.room-streams {
  display: grid;
  grid-template-columns: repeat(auto-fit, minmax(40%, 1fr));
  gap: 16px;
}
Users might join using their phone in which case their video will be most likely in portrait mode which causes a layout issue. Also, you might notice that your own video appears to be mirrored. Luckily there's an easy solution for both cases.
video {
  object-fit: contain;
  background-color: #000;
  width: 100%;
  height: 100%;
  max-height: 70vh;
}

video#self {
  transform: rotateY(180deg);
}
The end result should look like this:
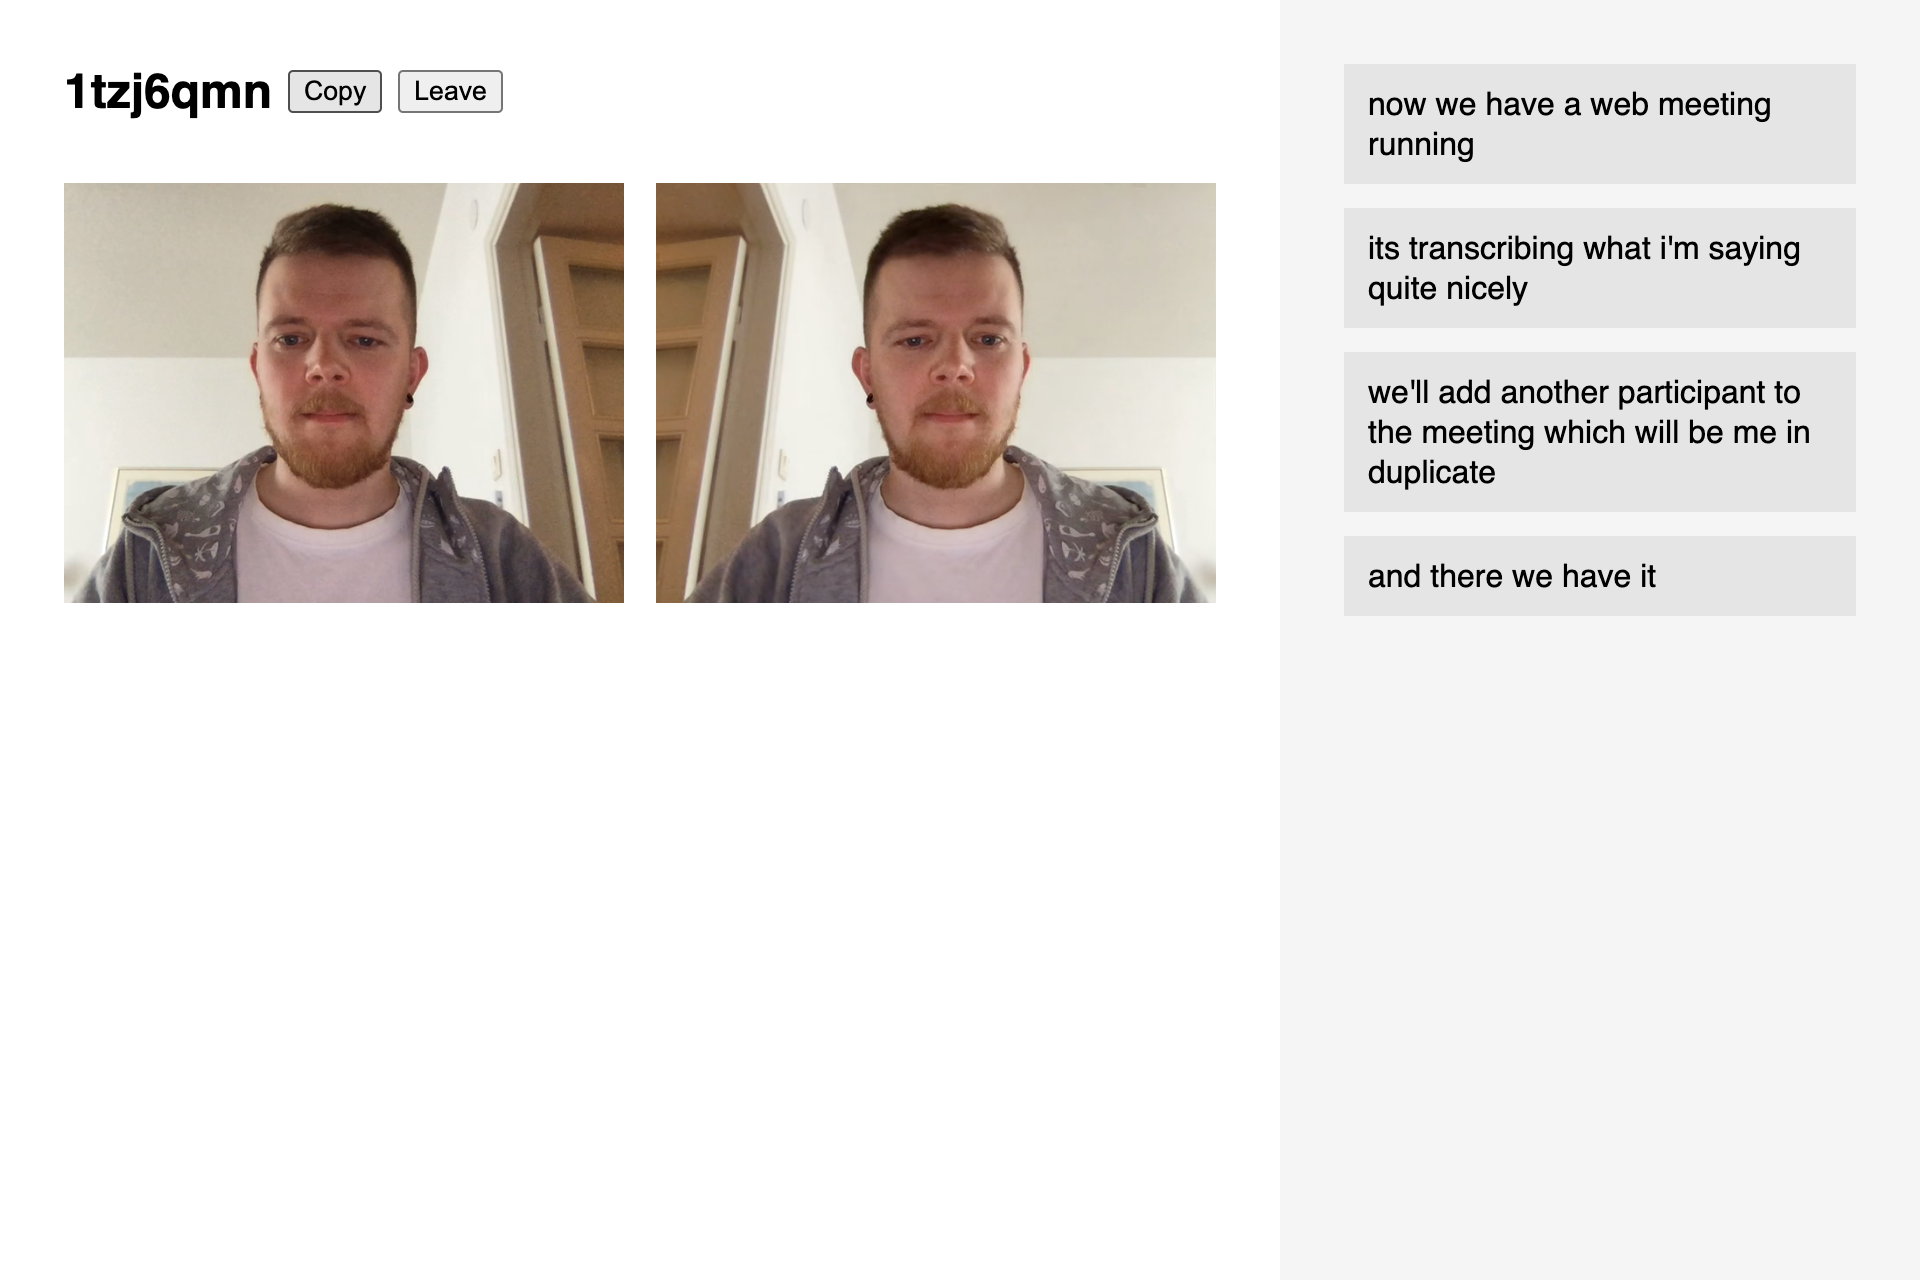
While it's quite easy to support multiple participants in a meeting, this guide does not try to cover transcribing the speech of multiple participants. In a case where another user joins the meeting, the Speechly Browser Client will use the MediaStream of whoever joined the meeting last and display their transcript. If you wish to compile a transcript from all parties, the best way to go about this is to:
MediaStreamYou can find the final project here.
In this tutorial, you learned about building an WebRTC video chat that Speechly to to provide real-time transcription. You also learned how to use a MediaStream as an audio source as well as about our new VAD feature. For the next step, consider deploying the application (Netlify and Vercel are both great options) and trying it out with your friends.
We hope you enjoyed this tutorial. Feel free to reach out to us on our Github Discussions page or via Intercom if you have any questions. Thank you!
Speechly is a YC backed company building tools for speech recognition and natural language understanding. Speechly offers flexible deployment options (cloud, on-premise, and on-device), super accurate custom models for any domain, privacy and scalability for hundreds of thousands of hours of audio.
Hannes Heikinheimo
Sep 19, 2023
1 min read
Voice chat has become an expected feature in virtual reality (VR) experiences. However, there are important factors to consider when picking the best solution to power your experience. This post will compare the pros and cons of the 4 leading VR voice chat solutions to help you make the best selection possible for your game or social experience.
Matt Durgavich
Jul 06, 2023
5 min read
Speechly has recently received SOC 2 Type II certification. This certification demonstrates Speechly's unwavering commitment to maintaining robust security controls and protecting client data.
Markus Lång
Jun 01, 2023
1 min read